Friday, January 27, 2012

Down to the point, of TWIRL

This weeks Illustration Friday word is Twirl. I think I have decided she should dawn the name. She was so much fun to make and as you will see from some of the drawings and pictures was completely different in her first stages.  She was originally Adline, and then Irean/Irene, check out the background post.

I photoshopped her mouth in this picture because thats what it actually looks like. I need to look into reformatting my XD card for my older camera so I can stop using the camera on my phone.


Now here is some step by step
I am going to show you how to needle felt!
I took you through dyeing the wool. Now it is time to get out your carders and card up the dyed, washed, and dryed, wool.

Carding is an art that, I defiantly need more practice at. It really helps to get alot of those last little bits of hay and grass out.


This is purple Alpaca roving from and the blue from a above is donated from 
Helga Hillyard
Green Acres Alpacas
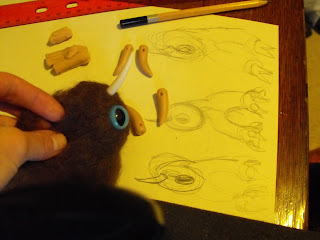
felting needle, bone horn (with hole through the end), sculpy and poprivit to make wholes in claws, doll eyes (and backs). I have two eyes cause I haven't decided which size to use.  


Now I get to work stabbing the roving (wool). The barbed needle pull the hairs into them self and dread them into a nice firm shape. It takes a lot of time but it is worth it. I am going to try to time the next one.

Here I have put the back on the eye and am felting around it. When the wool starts getting tight I pushed the back in tight to secure it. Then I started stabbing wool into the hole in the bone horn.


I keep layering on the wool and stabbing to make it firm.
Einsle and Gregory are in the background.
Here I am forming the claws out of sculpy and punching holes in to them. As many as possible to make  more hold for the wool. Then bake as the directed. Any paintable Palmer clay will work


Then just keep stabbing away!


These are some other drawings that I was working while making her! Sometimes it feels like the sculptures dictate how they are going to look as you build them.


Putting in the claws. The same as the horn on the head. Just staying through all the holes. This does tend to dull your needle I think.


I made the core of twirl out of some sheep wool that I have that was a little less soft, but it gets nice and firm. Then I put the purple alpaca over it. I made all the body parts first and then put her together.

Her now and here is her first incarnation.

Here is some different sketches. The two legged girl is her.


The schetches above are newer than the ones below
Thats all for now. 
If anyone would like to leave a comment or question you are most welcome to. 


Tuesday, January 24, 2012

Background


I thought I should get into the background of how Gregory, Einsle and the other characters, you will meet later, came to be.
(by the way I am listening to Zebra by Beach house 
and down to the well no more by Lead belly)


I first made Gregory for my son. This was 2008 or 9.... Lets see if I can find a picture.... OH I found one. I will put it up like this for now, but it is old and the colour is bad. hahaha. You can see my feet.
So that is him originally. 
(I'll post a pic of him now for contrast.)
I really liked him, and I thought I could sell them so I made more characters. At this time I didn't know what needle or wet felting was. I was making them out of fleece and felt, and stuffing them. I used a machine.


Fredrick

Adline.
I am now making a version of her that will be called Irene. She is Einsles partner. She will be part of Twirl, this weeks Illustration Friday.

There was another one, I can't remember his name at that time. He is now called Allarms and is very different from his original design. I will have to look for pictures.
  

Monday, January 23, 2012

PREPARE...

Hello!
I signed up for illustration Friday! I am hoping I can still up load last weeks illustration that was PREPARE.
I was thinking MY name is ... you kill my... prepare to die!
YA! great movie!

I like to make things I can hold in my hands and feel, so I like to make sculpture and clothing. I will use whatever medium I have most of at the time (or am iching to use). For this weeks illustration I made my Gregory character (handsewn, stuffed felt, and needle felted wool ray gun. (The other character in brown is Einsle. I will have to show you how to make him after.)

Here's some step buy step pics for Gregory.

The other dude in here with him is Einsle in his early stages of conception.


These are some sketches of gregory and some other dudes. 
Then on to making a Pattern.
On this page I am also brain storming the word funny. It was for a project.


I make the pattern out of paper, giving room for sewing the edges and turning inside out. I made the arms separate so that he can be holding the ray gun out from him. I pin the pattern on some felt and cut out.


Hand sewn together and stuffed. I also made a gun sling that, I later decided was better on the hip then over the shoulder. I probably could have shown more steps, and will do in the future. 
So that is the making of Gregory!

The ray gun and Einsle are a different story!
I will talk about Dying wool in this page, but I get in to felting in to the point of twirl.


We need to start at the very begining. I was VERY generously donated almost 3 pounds of very soft alpecca wool from
Helga Hillyard
Green Acres Alpacas

So I went to work with my favourite dye, KOOL AID.
Use a glass container, small amount of hot water, stir in desired amount of Kool Aid. I am just experimenting mostly. I am trying to get the basic colours. 
Kool aid is some times hard to find.

So if you "know" me and you find real blue or yellow Kool aid, buy it for me! I will pay you back. PLEASE> It is so hard to find those colours.

Mixing the wool in gently and making sure it is all submerged in the Kool aid. (By the way, I don't give my kids kool aid to drink more than once a year. Mainly because I think of what it does to the wool, it must do to my insides.) My hands by the end of the night were covered in dye, but it came off in the shower.


I have done it a few different ways. Both using a scale and eyeballing weight seems to work fine unless you are trying for a specific colour. I found a great web site for Kool aid dyes. It tells you so many colours you can make!
This time I started out with an oz of wool to 4 packets of a colour of Kool aid. I tried slowly adding hot water and stirring.
This didn't work so I put several bowls in a pre heated to 200 F oven, then turned it up 25 degrees every 30 min till it look sizzling (not boiling). I let them stand in the oven for hour or so, and rinse with natural soap. Being careful the whole time to not shock the wool with extreme temperatures. Then I let the wool dry on a grate.


The colours in real life look so good!! sorry for that!
K I think I should start a new page!!!!!!!!!!!!!